Creating HDR Photos in Lightroom
Gear
Gear Focus
May 24, 2021
HDR or High Dynamic Range Photos are a great way to really show off an object or a place. HDR is typically used in places like real estate or architectural photography as well as landscapes. Lets follow along with this quick tutorial on creating HDR photos in Lightroom and jump right into it!
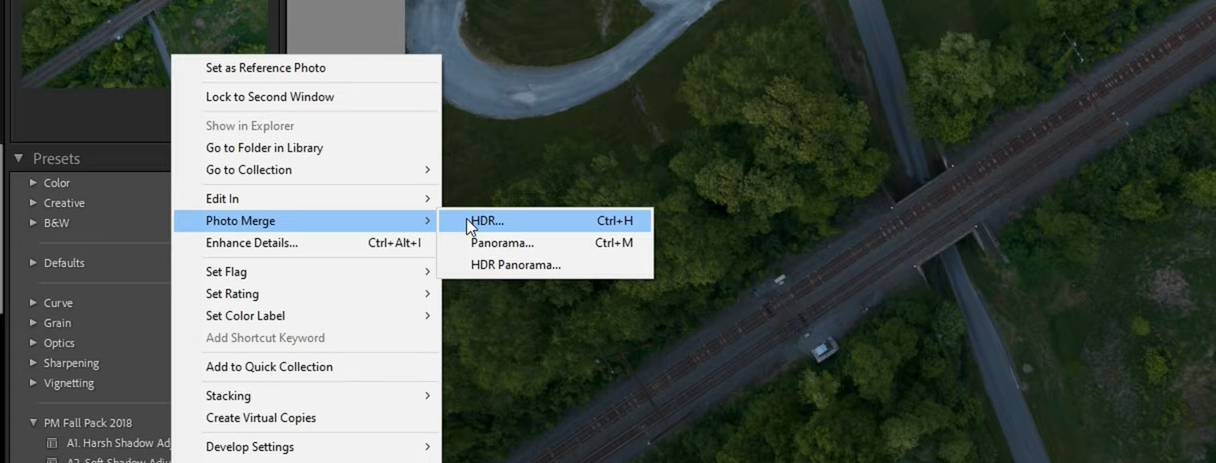
Now that you have your exposures, you can head into Lightroom to actually put those photos together. After we import our photos, we are going to select our new photos, right click and go to photo merge-> HDR or we can use our keyboard shortcut which is CTRL + H. Y'all know how we love our keyboard shortcuts! After that it’ll open up the HDR window prompt. For most pictures the stock settings will be fine. If you have some motion in your photos, you may have to mess with the de-ghosting, but typically the stock settings will be fine.
Click ok and then that’s it! That’s your HDR. You can now edit that as a normal photo!
HDR Photos in Lightroom
https://youtu.be/Qra9E8jO1Fo HDR photos are a great (and easy!) way to bring depth to your photos. It is easy to create HDR photos in Lightroom. Use HDR photography to help even out the exposure from high contrast lighting conditions such as a room with a window that is letting in a ton of natural light, or an aerial photo that loses highlights in the landscape or has a blown out horizon.Getting Started with HDR Photos in Lightroom
HDR or High Dynamic Range photos start in the camera. To make this happen, you need a camera with AEB or Auto Exposure Bracketing. Most modern DSLRs and mirrorless cameras have this option. We are using the DJi Air 2S in this tutorial. The Air 2S is set to take 3 different exposures. The way that AEB work is you camera will snap a shot at the exposure you set. It will then automatically take a shot under exposed as well as a shot that's overexposed. You can set how high or low you want your camera adjust your exposure. Personally, we tend to use the 2 stop adjustment as we have found that only doing a single stop in either direction doesn't capture quite enough range.Now Over to Lightroom
Now that you have your exposures, you can head into Lightroom to actually put those photos together. After we import our photos, we are going to select our new photos, right click and go to photo merge-> HDR or we can use our keyboard shortcut which is CTRL + H. Y'all know how we love our keyboard shortcuts! After that it’ll open up the HDR window prompt. For most pictures the stock settings will be fine. If you have some motion in your photos, you may have to mess with the de-ghosting, but typically the stock settings will be fine.
Click ok and then that’s it! That’s your HDR. You can now edit that as a normal photo!
Also Keep in Mind
A few things of note before we wrap this bad boy up. Lightroom will do a base edit for you automatically based on where it thinks they should be. You can always go back and change that if you want to. Another thing to keep in mind is that shooting AEB photos in a RAW format maintains the RAW flexibility after the HDR is made! So shoot in RAW!! We really hope this tutorial is helpful! Let us know if you have any questions at all and be sure to head on over to the Gear Focus YouTube channel to learn more. Stay safe, stay healthy and remember Gear Focus is always here to help feed your passion!Own one like this?
Make room for new gear in minutes.
Loading...