The Ultimate Rig Building Guide for the Sony FX3
GearFocus
Apr 14, 2023
Today we want to talk about camera rigs. Specifically why YOU should build one, how it can be valuable to you, and all the parts that make up a proper rig. Along the way, Josh will show you what he considers the best camera rig he’s ever built.
So the first question to answer in building a rig is…why? Apart from looking cool, there are a lot of things on a camera rig that can benefit you when shooting on set. You’ll want to attach important items like monitors, viewfinders, wireless transmitters, v-mount batteries, and plenty of cables. Let’s go through Josh’s rig to give you an example.
CAMERA/LENS/Cage
For Josh’s rig, he’s using a Sony FX3 within a Kondor Blue cage and a Tamron 28-75mm. Keep in mind you can build out this rig with whatever camera you’d like.
BASEPLATE:
We’ve opted for the 15mm Kondor Blue baseplate with a Manfrotto 502 receiver. Josh also added a small rig Arca Swiss plate so he could easily take the camera on or off. The rig has two 15mm rods from Tilta through the base with a v-mount plate on the back. Lots of folks talk about v-mount batteries and this is a good example of being able to power a camera rig with one battery. With a small rig v-mount battery, you can charge the camera through USBC and run the camera setup for 5 hours…easily.
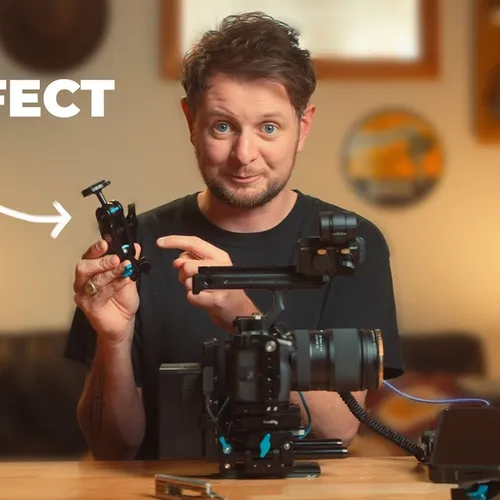
TOP HANDLE/MONITOR MOUNT:
Once the camera is attached securely to the base you can securely add a top bandle. In our example, we’re using the Nato Rail to attach and they have plenty of different mounting points and a cable that you can plug into your camera so you can hit the record button on top and not awkwardly reach down and hit the camera body record button. This saves a bunch of time when shooting handheld projects. We’ve also added the tilt-adjusting mount from Kondor Blue. It’s a great quick attach system that allows you to easily take on and off a monitor. What’s great about this mount is you can also choose the tension you’d like on the pan and tilt, and use the set screw on the back to lock it in.
MONITOR:
Next up you’ll need a monitor. We’ve attached the Atoms Shinboi. We’ve used a bunch of different monitors and for the price, it doesn’t get much better. It’s extremely clear, takes a 1080p signal, and is much brighter than the monitor on the Sony FX.
POWER:
One of our favorite accessories on any rig is the D-tap hub from Kondor Blue. We attached it to the side of our rig and it allows us to power EVERYTHING in our setup, no questions asked. If your rig has multiple power needs (which we’re sure it does), definitely pick one up.
CONCLUSION:
Hopefully, you found our video helpful and if you have any questions regarding this rig or what would work for you please leave a comment below and we’d love to help you get set up.
Own one like this?
Make room for new gear in minutes.
